Introduction↑
This article talks about building our own Raspbian image, reading gpsd data, dealing with issues withing GPS and NMEA, caching everything with redis, trying strongly typed domain modeling in Python (of all places) and using concepts borrowed from scala and Haskell to first scaffold function signatures, then building them (specifically around types and how we can use effects to annotate our scaffolding, even though we don’t have an effect framework); on how we can use scala with Flink and Kafka to consume a stream with (more or less) exactly-once semantics in a handful of lines, and how we can visualize and analyze GPS data via Superset.
In other words, it’s a bit of a wild ride and, as I’ll be the first to admit, not always the most straightforward.
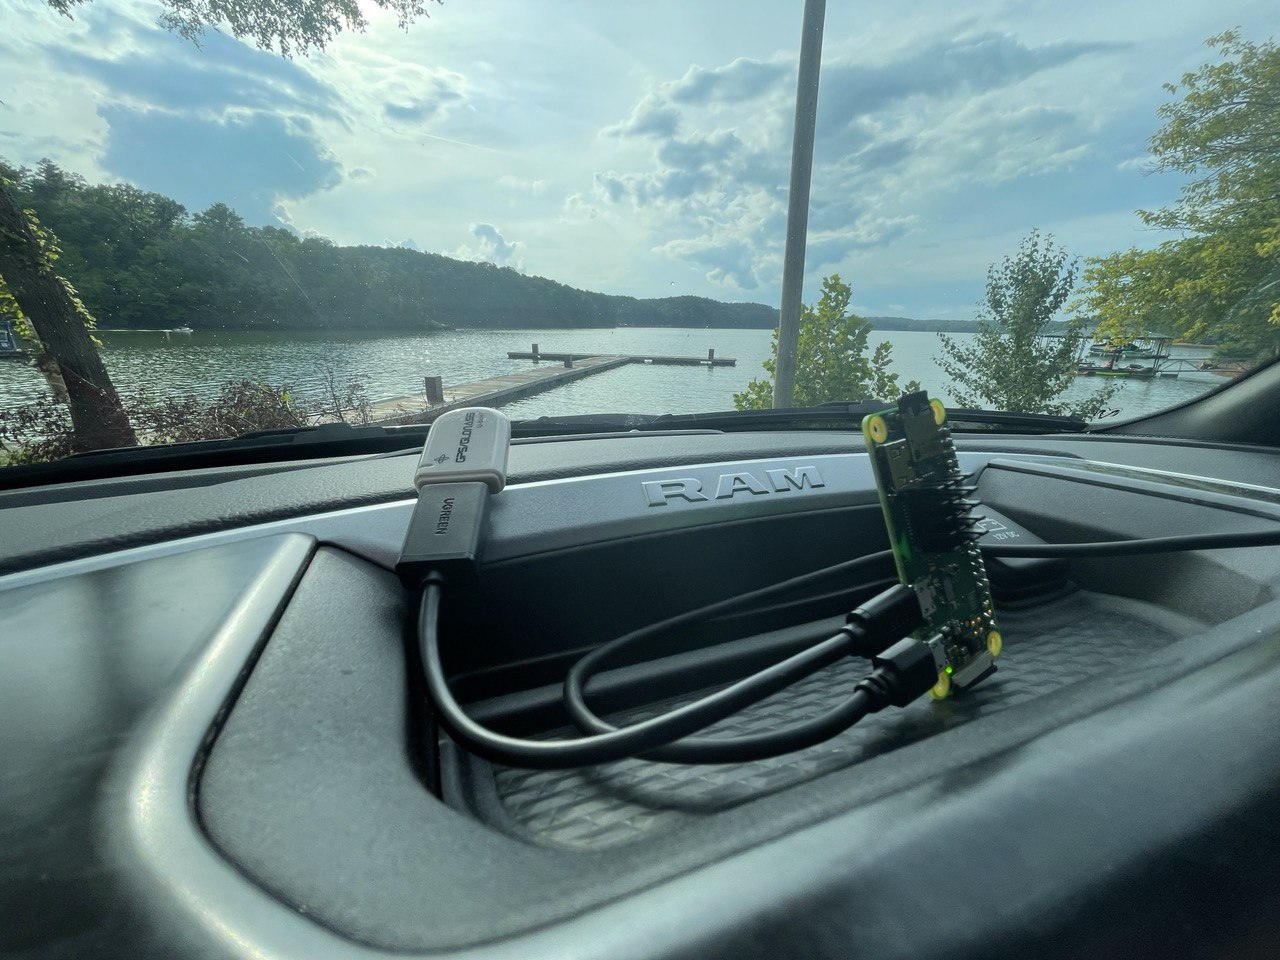
A test drive..
You might be interested in this article if…
- You like
Linux. This article makes heavy use of it, down to the serial ports. - You like playing around with
PythonandScalaand want to weirdly reason about types in a language that thinks3*3 is '333'and where that makes perfect sense, coming from a language where a frameworks’log.info()type signature readsdef info(message: => String): F[Unit](because, of course, they are effectful and log messages are functions. It’s a lot of fun and even semi-productive!) - You think cars are cool and/or have a knack for GPS data everything geospatial (can I interest you in map projections and call out flaws in
EPSG:4326?) - You think streaming systems are neat and
FlinkandKafkaare interesting - You think building a system that’s designed to cache offline and then turn into a streaming client sounds interesting (you can call that “IoT” if you think it’s cool)
- You generally like somewhat low-tech things talking to somewhat high-tech things, in this case going from serial devices that care about baud rates all the way through real-time, persistent streaming systems that can write
Icebergdata into cool, distributed data lakes, or anything in between
Then carry on!
This is Part 1. Part 2 can be found here.
All code can be found on GitHub.
Structure↑
Since this article is pretty long, here’s whats going to happen. Feel free to skip sections, I think most things can stand on their own.
- We’ll talk architecture. Systems Design!
- Building a custom
Linuximage: A deep dive on how to do it and why you should bother - Next, we’ll design the client by reasoning about types in
Python - And we’ll talk about implementation details, also
Python - Conclusion & Next time in Part 2
Telematics (once again)↑
I wrote about the topic before (twice, actually). Telematics just means “creepily tracking your every move while you operate your vehicle (and maybe plug into your OBD port).
Now, the thing is: I mostly drive a 2021 RAM 1500 Truck. RAM already offers what they call “RAM Telematics™”:
Ram Telematics™ is a web-based fleet management solution designed to help you monitor your entire business with real-time data and insights. Talk to your local dealer to learn how Ram Telematics helps business owners and managers with fleets of all sizes improve day-to-day operational efficiency.
It is, however, also not available for me, a mere plebeian who uses his truck to haul dirt and mulch and go up mountain roads, because 4x4s are fun.
Sure - you can get hum, but that’ll run you $99 retail, a $35 activation fee and it’s $15/mo. Also, I really don’t want anybody to have all my (real-time!) location data, and the more I think about it, the less do I need this to be actually real time.
But it is cool to see where you’re going and data mine all that data, and it’s even cooler if you can do it without giving all your data away for free to Google Maps.
So why don’t I do what I do best and overengineer something myself?
The Plan↑
In the last iteration, everything was done via AWS - this was a fun project to play around with AWS IoT Greengrass and the like, but the solution ultimately ran on somebody else’s computer (“the cloud”) and the client application ran on my full-size System76 laptop, which isn’t exactly portable.
Also, this just happened. Also this:
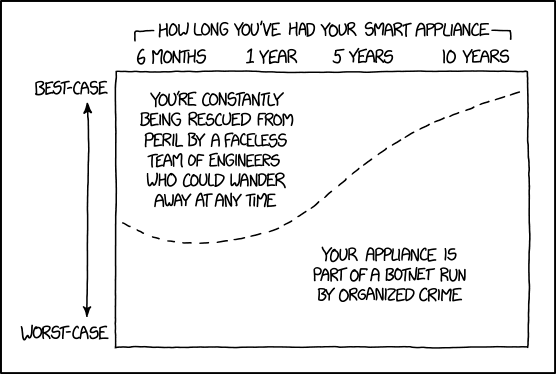
(Credit: Credit: XKCD)
The first iteration in 2017 used Hadoop and an app to collect the data.
So, this time, we’ll do it differently - we’ll do it offline and completely “in-house”. Which is ironic, given the topic, but I was told not to make too many stupid puns.
A (simple) cached, offline architecture↑
What made the previous iterations somewhat complicated (as they were mostly intended as a tech showcase) was their dependency on the internet and third party tools. While fun to play around with, not super usable.
This topic is actually something I’m somewhat passionate about - I have a thing for maps, geospatial data, zoning, geography (…), both in real-life as well as on a theoretical level. In fact, I’ve recently amused a bunch of people greatly by saying
“Oh, that’s like 2 Walmarts!”
(~20 acres or 8 hectares, since I previously looked up the local Wally World on the county’s GIS map), which was dubbed as something along the lines of “the most American unit of measurement”. Anyways…
So, we’ll keep it simple this time around and focus on the following architecture:
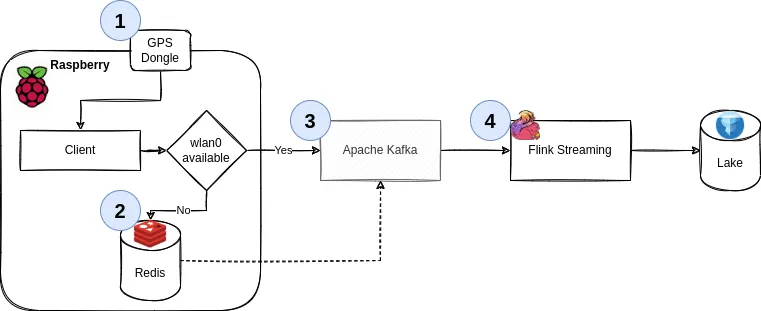
We’ll go through the details, but it boils down to the following principles:
- Use
gpsdto get geo data from a physical USB GPS dongle - Work offline by default. Cache all your data if there’s no internet available
- If you can (i.e., are online), publish all your data to a streaming pipeline via
Kafka - Said pipeline persists the data
1. Collect data via GPS↑
A Raspberry Pi Zero (the original one, that is - armv6 and all) collects GPS data via a USB OTG dongle. The code for that is trivial - here’s the entirety of it from last time around:
def poll_gps(_gpsd, batch=128): print('Starting GPS poll, batch: {}'.format(batch)) data = [] i = 0 while True: report = _gpsd.next() # TPV - Time Position Velocity if report['class'] == 'TPV': # Get data lat = getattr(report, 'lat', 0.0) long = getattr(report, 'lon', 0.0) time = getattr(report, 'time', '') altitude = getattr(report, 'alt', 'nan') speed = getattr(report, 'speed', 'nan') record = Record(lat, long, altitude, time, speed) data.append(json.dumps(record.__dict__)) if i >= batch: push_to_iot_core(data) data = [] i = 0 else: i += 1(We’ll soon learn how the devil’s in the details with this snippet)
2. Cache data↑
Now, instead of calling something like push_to_iot_core, we’ll have a different control structure: In case we are offline (the default), push data into redis. Without wanting to go into too much implementation detail, this is a matter of having a tiny client that calls RPUSH occasionally.
redis can run with a very minimal memory and CPU footprint. Given the nature of data we’re collecting, we can set lax data persistence expectations. It also has native ARM support.
3. Send data if you can↑
However, once have a connection to a pre-determined WiFi network, we’ll grab all data from our local cache and push it to an Apache Kafka instance which can serve as a message broker. In fairness, we could use any type of message broker or REST endpoint here - but Kafka plays nicely with others.
4. Process data↑
From Kafka, we’ll use Apache Flink to consume data. The resulting data can be written to Apache Iceberg or any other format (see here).
Note: In this article, we’ll write to a MariaDB SQL database instead of Iceberg + Trino, because there is enough infrastructure and complexity to deal with as-is. Iceberg is a fascinating piece of tech and I’ve played around with it before, but this article is already pretty long. Also, MariaDB can do spatial functions, which will come in handy later on.
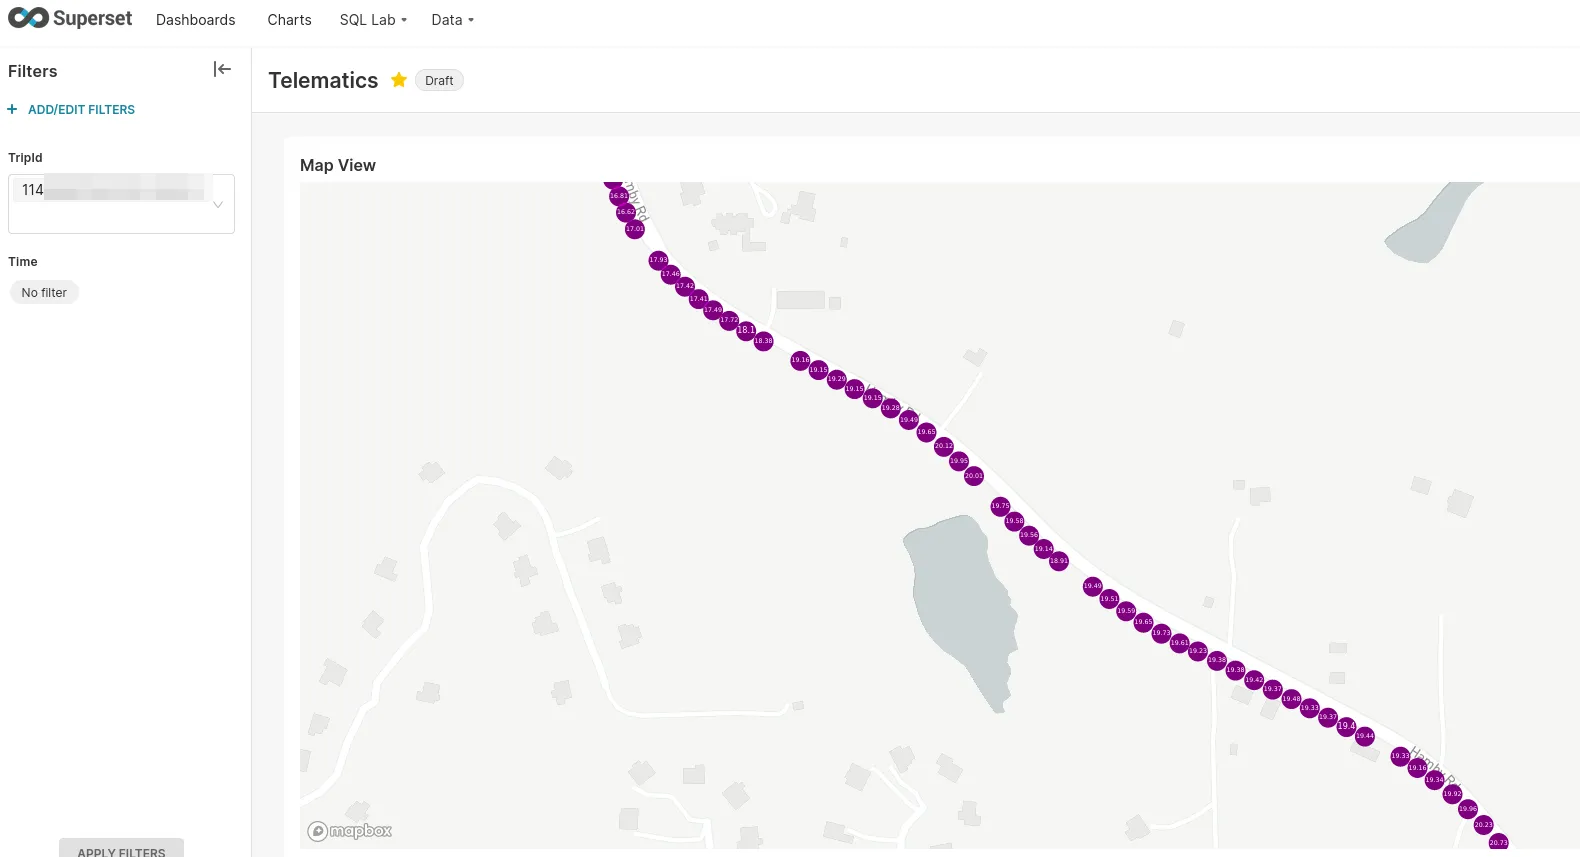
5. Visualization↑
At the end, we’ll use Apache Superset to visualize the data:
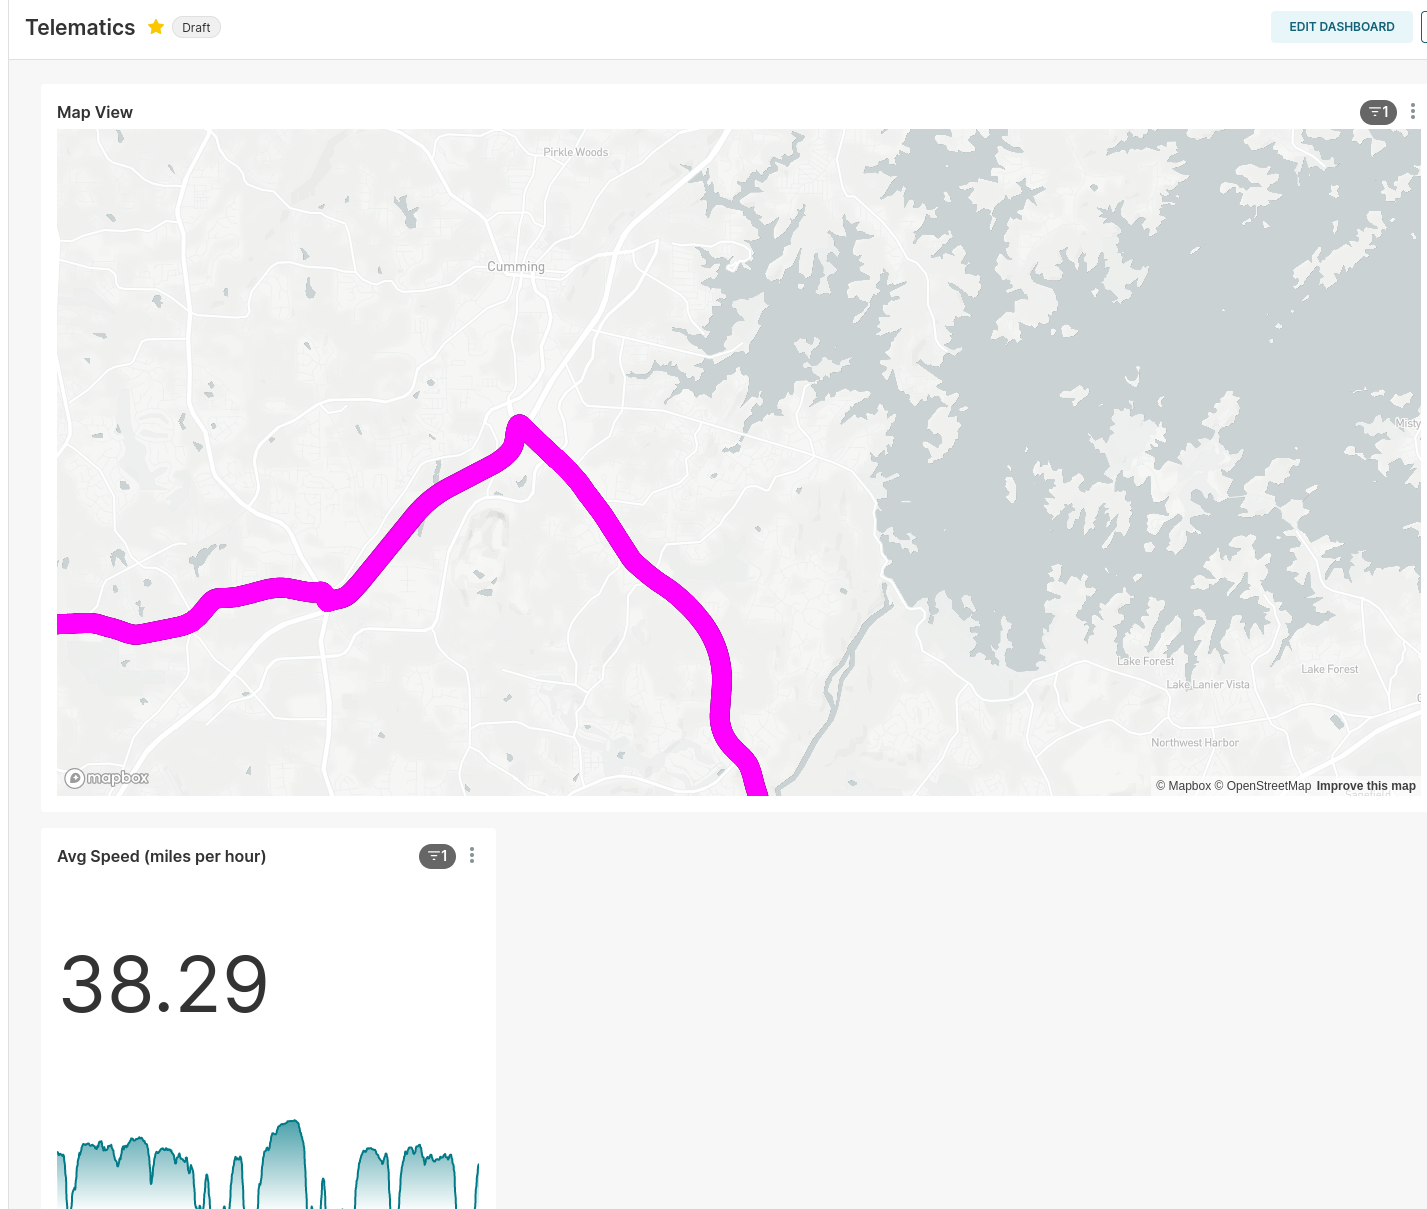
A drive near a lake..
Other assumptions & language choice↑
Since we’re running on a low-powered SBC, we’ll be single-threaded and block on each IO operation. This makes fulfilling the contract (see below) very easy.
Since we’ll be on a small Raspberry Pi Zero, we’ll also assume power saving is relevant and that it should auto-terminate if not in use (see below).
With regards to languages, we’ll use Python for the client (because we have code we can re-use - see above) and Scala for the Flink app, because Scala is fun and I feel like it. ¯\(ツ)/¯
An equally simple contract & model↑
We need 2 things for a decent design for our client (the starting point) here: A contract (What can the client guarantee and what can downstream plan for?) and a model, i.e. what we’re trying to produce. I’d love to introduce a metadata layer and schema registry here, but I’ll refrain from doing so.
Contract↑
The contract can be simple, but must be as follows:
- We do not guarantee exactly-once delivery (we can send duplicates)
- We do guarantee at-least once delivery (we won’t drop messages)
- We do guarantee order
The latter is easy to realize, since we have distinct, autonomous, single-threaded clients that block on each IO interaction. “Not exactly-once, but at-least once” is also an equally simple pattern, as this simply means “if it fails, just do it again”.
Model↑
I’ll steal the model from last time, with minor adjustments:
@dataclassclass GpsRecord: tripId: int # on arm64/x86, 64 bit; otherwise, 32 lat: float # for SQL, a high-precision DECIMAL! lon: float altitude: float speed: float timestamp: int = int(time.time() * 1000) # just because timestamps are a pain userId: int = uuid.getnode()Simple, but does what we need it to do for now.
Note: This is not a good model that would support multi-user use cases - it lacks good primary keys, partitions, even more attributes (nmea data is rich), but good enough to support a handful of users that drive different trips in different vehicles.
The userId is based on the hardware address as a 48-bit positive integer, which is a naive approach that’ll work for now.
The tripId is a random 32bit integer on a Raspberry Pi Zero, and a random 64bit long on systems that support it. This works well enough to uniquely identify a trip, since our entire process terminates every time it believes a trip to be over and hence, generates a new UUID upon restarting.
Realistically, with a 32bit length, we’d need to do collision checks in the streaming pipeline.
Building a custom Raspbian/Linux image↑
Now that we have the design out of the way, let’s consider our execution environment. It’s somewhat important to understand where our code will run.
Power Savings: Car Batteries are weird↑
Now, my truck comes with two 400W regular 115V power outlets and a 12V outlet with a 20Ah fuse (240Wh max), plus USB A and C ports - that is ample power to power a full size laptop (and I’ve done it before). So a Raspberry Pi should be a trivial thing to operate.
However, assuming a car battery for an older vehicle, say a 1998 Chevy Lumina with the 3.8L V6 (a more appropriate vehicle to jam random electronics into), would probably have a capacity of 600 or so Wh (12V at 45Ah), which of course isn’t exactly what a car battery is designed for (they are designed to output short bursts of extremely high current and are usually specified via “Cold Cranking Amps”, a delightfully obscure unit of measurement defining the sustained Amps a 12V battery can deliver at 0F for 30 seconds, but that doesn’t matter).
Suppose, now, that our Raspberry Pi Zero W with a dongle pulls in 1A (which is high, but its rated for up to 2.5A). Assume 50% efficiency from a cheap PSU/voltage converter (since the Pi takes 5V), so we really need 2A. So the little Pi could, theoretically, drain a car battery after 300 hours, or 5 days on 24hr power draw. I certainly have not moved my vehicle for 5 days at a time (think vacation), so that is a surprising amount. Somebody check my math here, because I was expecting to write a bit about how it would last 6 months and that we need to still prepare for no good reason whatsoever.
Measuring & Reducing Power Draw↑
Now, originally, I built this extremely cursed measuring apparatus:

This is what peak performance looks like..
Which, while it works (iTs nOt fUseD yadda yadda, nobody cares), is not necessarily precise (even though this board had, if I recall correctly, WiFi enabled and ran some python garbage, so 120mA seems about right). I wager to guess that the redneck-engineering nature of it added an ohm or two of resistance.
Anyways, fortunately for us, smart people with good equipment have already done all this work for us: Raspi.tv did some benchmarking and various other folks around the web ran tests (like this or that) around disabling things.
- A standard, idling Zero W runs at about 120mA
- Disabling HDMI, LEDs, and minimizing background tasks (i.e., aiming for low utilization) is worth about 40mA (even though others report more, which I find… unlikely)
While 120mA doesn’t exactly sound like it’ll drain a full size truck’s battery any time soon, it’s still a good idea to at least consider bloat and power draw.
Reproducible Builds & Speed↑
One way to save power - and to make reproducible builds - is to build our own Linux image.
You can do all of what follows on the Raspberry, but especially things like compiling redis tend to be a whole lot faster and easier on a full-powered GNU/Linux computer.
Speed has never killed anyone. Suddenly becoming stationary, that’s what gets you.
- Jeremy Clarkson
It also allows you to keep and re-deploy the img file onto different machines. I tend not to do this, but every time I come back to a project, setting up an environment becomes a nightmare - but not if you keep an image file around!
It’s essentially what you did before Docker to make your builds work every time! [1]
So: Reproducible Environment + Speed = Great Success.
[1] For the love of god, do not take this seriously. It is, however, a decent idea to at least consider for a decent dev cycle - a more honest comparison is to build your own Docker base image.
Building a small image↑
Let’s do it. Your mileage may vary based on architecture and base image.
Getting Started↑
To poke around, we can download a Raspbian Lite image and mount it, keeping in mind that we have 2 partitions available.
In other words, you need to tell your tools where to start reading data. It’s like plugging in a USB thumb drive… but with math involved. Isn’t that fun?
❯ unxz 2022-04-04-raspios-bullseye-armhf-lite.img.xz❯ fdisk -u -l 2022-04-04-raspios-bullseye-armhf-lite.imgDisk 2022-04-04-raspios-bullseye-armhf-lite.img: 1.88 GiB, 2017460224 bytes, 3940352 sectorsUnits: sectors of 1 * 512 = 512 bytesSector size (logical/physical): 512 bytes / 512 bytesI/O size (minimum/optimal): 512 bytes / 512 bytesDisklabel type: dosDisk identifier: 0x7d5a2870
Device                                      Boot  Start     End Sectors  Size Id Type2022-04-04-raspios-bullseye-armhf-lite.img1        8192  532479  524288  256M  c W95 FAT32 (LBA)2022-04-04-raspios-bullseye-armhf-lite.img2      532480 3940351 3407872  1.6G 83 Linux
❯ mkdir -p /mnt/raspi# 532480 * 512 = 272629760❯ sudo mount -o loop,offset=272629760 2022-04-04-raspios-bullseye-armhf-lite.img /mnt/raspi
There are some tools that do this for you, but all you really need is mount (and maybe a calculator to figure out the offset in bytes). See mount’s man page for details.
This type of mount knows about three options, namely
loop,offsetandsizelimit, that are really options to losetup(8). (These options can be used in addition to those specific to the filesystem type.)https://man7.org/linux/man-pages/man8/mount.8.html#LOOP-DEVICE_SUPPORT
Resizing↑
Since the default image file is small, let’s make it a big bigger so we have space to work with, by first resizing the image file, then the partition.
# Cutting the branch you're sitting on and all that❯ sudo umount /mnt/raspi# Resize the img file❯ qemu-img resize ./2022-04-04-raspios-bullseye-armhf-lite.img 4G# Resize the partition❯ sudo parted ./2022-04-04-raspios-bullseye-armhf-lite.imgGNU Parted 3.4Using /home/christian/Downloads/raspi/2022-04-04-raspios-bullseye-armhf-lite.imgWelcome to GNU Parted! Type 'help' to view a list of commands.(parted) printModel:  (file)Disk /home/christian/Downloads/raspi/2022-04-04-raspios-bullseye-armhf-lite.img: 4295MBSector size (logical/physical): 512B/512BPartition Table: msdosDisk Flags:
Number  Start   End     Size    Type     File system  Flags 1      4194kB  273MB   268MB   primary  fat32        lba 2      273MB   2017MB  1745MB  primary  ext4
(parted) resizepartPartition number? 2End?  [2017MB]? 4295MB(parted) printModel:  (file)Disk /home/christian/Downloads/raspi/2022-04-04-raspios-bullseye-armhf-lite.img: 4295MBSector size (logical/physical): 512B/512BPartition Table: msdosDisk Flags:
Number  Start   End     Size    Type     File system  Flags 1      4194kB  273MB   268MB   primary  fat32        lba 2      273MB   4295MB  4022MB  primary  ext4
(parted)# exit & resize2fs & persist❯ sudo udisksctl loop-setup -f 2022-04-04-raspios-bullseye-armhf-lite.img❯ lsblkNAME            MAJ:MIN RM   SIZE RO TYPE  MOUNTPOINTSloop0             7:0    0     4G  0 loop├─loop0p1       259:7    0   256M  0 part└─loop0p2       259:8    0   3.7G  0 part❯ sudo e2fsck -f /dev/loop0p2❯ sudo resize2fs /dev/loop0p2# Unmount everything, mount again❯ sudo losetup -D❯ sudo mount -o loop,offset=272629760 2022-04-04-raspios-bullseye-armhf-lite.img /mnt/raspi
chroot & setup↑
We can now chroot into this - or use systemd-nspawn to avoid having to manually mount /proc and the like (which you can). You’ll probably need qemu for the (presumably) x86 -> ARM emulation. On a side note, I’d be curious to see how an M1 Mac handles this.
sudo apt-get install systemd-container qemu qemu-user-static binfmt-support qemu-utils# root@raspi:~## root@raspi:~# df -hT# Filesystem Type Size Used Avail Use% Mounted on# /dev/loop0 ext4 3.7G 1.2G 2.3G 35% /And now we can set this up just the way we like it - in this case, installing some dependencies ahead of time and disabling some stuff.
We’ll start by setting up some basic dependencies and the user:
raspi-config # disable I2C, SPIecho 'hdmi_blanking=1' > /boot/config.txt # disable HDMI
# We need this for the GPS dongleapt updateapt-get install gpsd gpsd-tools gpsd-clients ntp -y# And for Pythonapt-get install python3-distutils python3-apt git vim libffi-dev -y# Set up the telematics user with ituseradd telematicspasswd telematicsusermod -aG sudo telematicssudo mkdir /home/telematics && sudo chown telematics:telematics /home/telematicssu telematics && cd ~
Followed by the Python environment - keep in mind that pyenv builds from source, and that Python is really mostly C.
# Install poetrycurl -sSL https://raw.githubusercontent.com/python-poetry/poetry/master/get-poetry.py | python -echo 'PATH=$PATH:$HOME/.poetry/bin' >> /home/telematics/.bashrc# Install an appropriate python versioncurl https://pyenv.run | bashecho 'export PYENV_ROOT="$HOME/.pyenv"' >> /home/telematics/.bashrcecho 'command -v pyenv >/dev/null || export PATH="$PYENV_ROOT/bin:$PATH"' >> /home/telematics/.bashrcecho 'eval "$(pyenv init -)"' >> /home/telematics/.bashrcsource /home/telematics/.bashrc# To build pythonapt-get install make build-essential libssl-dev zlib1g-dev libbz2-dev libreadline-dev libsqlite3-dev wget curl llvm libncursesw5-dev xz-utils tk-dev libxml2-dev libxmlsec1-dev libffi-dev liblzma-dev -y# And installpyenv install 3.8.13# Alternativelysudo add-apt-repository ppa:deadsnakes/ppasudo apt-get updatesudo apt-get install python3.8 -yWe’ll then install the application (more on that in a minute). Depending on whether it’s an original Raspberry Pi Zero (W), we might need to use a systemd service. Otherwise, Docker would work well. We’ll come back to that. We’ll also build redis and enable a service for that.
# Install the application + all dependenciesgit clone https://github.com/chollinger93/TinyTelematics.git && cd TinyTelematicspoetry env use ~/.pyenv/versions/3.8.13/bin/python3poetry shellpip3 install --upgrade pippoetry installpoetry build# Set up a service (if we're not running via docker, see below)sudo cp system/tiny-telematics.service /etc/systemd/systemsudo systemctl enable /etc/systemd/system/tiny-telematics.service# Back to rootexit
# Build / install redisVERSION="7.0.4"mkdir /etc/redis/wget https://github.com/redis/redis/archive/${VERSION}.tar.gz -O  /etc/redis/redis-${VERSION}.tar.gzcd /etc/redistar xzf redis-${VERSION}.tar.gz && rm redis-${VERSION}.tar.gzcd redis-${VERSION}makeln -s /etc/redis/redis-7.0.4/ /etc/redis/latestmkdir /etc/redis/latest/binmv /etc/redis/latest/src/redis-server /etc/redis/latest/bin/echo 'export PATH=$PATH:/etc/redis/latest/bin' >> /home/telematics/.bashrc
# And set up a systemd servicecat <<EOT >> /etc/systemd/system/redis.service[Unit]Description=RedisAfter=syslog.target
[Service]ExecStart=/etc/redis/latest/bin/redis-server /etc/redis/latest/redis.confRestartSec=5sRestart=on-success
[Install]WantedBy=multi-user.targetEOTsystemctl enable /etc/systemd/system/redis.service
# Install docker# See armv6 woes: https://markmcgookin.com/2019/08/04/how-to-install-docker-on-a-raspberry-pi-zero-w-running-raspbian-buster/sudo curl -sL get.docker.com | bash
# use apt to remove packages, add your wpa_supplicant.conf, change configs, replace existing tools with more lightweight options - do whatever# for me, I've edited /etc/resolv.conf for my custom DNS server and /etc/hostname + /etc/hosts
And there you go, your very own Raspbian distribution!
Flash to an SD card↑
Use the imager tool to flash it to an SD card & make sure you customize your WiFi settings.
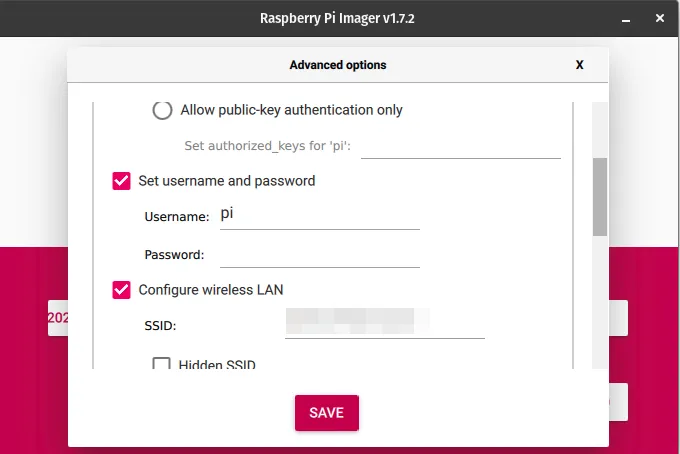
Fun fact: On PopOS! with an NVidia GPU not running in hybrid mode with the IGPU, this tool crashes and I have no idea why, but I assume GTK explodes somehow.
A note on the usefulness of building an image↑
There are many other ways of doing this - DietPi comes to mind - and the benefits for this particular application in terms of power saving are dubious at best. It is, however, a good exercise to know how to do it, and, perhaps more importantly, makes this process much easier to test and reproduce builds, something that always tends to be a nightmare with Raspberry or embedded builds.
One thing I will say - doing it like this shaves hours off compilation time, e.g. when pyenv install compiles CPython from scratch. Especially when working with multiple small computers, not having to write a script and run it for ages is very valuable.
What I would do differently, however, is to also compiled gpsd at this step, but that’s a bit of a tall order.
We’ll call out how to use docker later to bundle dependencies and build multi-arch images, but that’ll only work for armv7 and arm64 architectures. I’ve personally had to use bare metal with systemd. I do not particularly like systemd.
The Client: Collecting Data & Caching it↑
Since we now have a leg to stand on (i.e., an image), let’s put together the client real quick. For this, we can re-use some old code. I’m keeping this nice and simple, rather than trying to build anything fancy.
Please note that we haven’t set up Kafka yet - that’ll happen in Part 2.
Setup↑
First, we’ll use poetry this time around to make the environment a bit easier to handle. I cannot express how much I love poetry.
Install it:
curl -sSL https://raw.githubusercontent.com/python-poetry/poetry/master/get-poetry.py | python3 -And create a new project:
poetry new tiny-telematicsmv tiny-telematics/tests tiny-telematics/tiny_telematics tiny-telematics/*toml .From there on, we can use neat things such as poetry add to add dependencies that grab proper versions. It’s like sbt or maven or even gem, but for Python! It’s incredible!
All in all, poetry makes a lot of things I despise about Python - project setup, virtual environments, dependency management, endless scripts - much, much easier. Big fan.
Scaffolding by means of reasoning about types↑
Okay, environment down. Let’s talk code.
Taking a page from my scala experiments, let’s not overthink this and just sketch out a handful of method signatures and approach this mostly procedurally (rather than really functional, since we’re doing nothing to avoid effects).
Note: This is a real thing I do in every language that’s forced upon me - python, scala, Java, go, Ruby, TypeScript - I plan out functions and their types before anything else, and accept the fact that I’m often wrong and change things. In fact, what you see here isn’t a 100% match to what’s on GitHub. But it is how I work, and I’ve recently added the whole “effectful” thing to that methodology, as called out in the linked article.
I’ll be writing this as if we had an IO monad and a Resource, just to call out side effects, but I won’t reason about any other algebras or higher-kinded types. Think of it as documentation. The official Python docs are open about the languages shortcomings (for once):
Python programs written in functional style usually won’t go to the extreme of avoiding all I/O or all assignments; instead, they’ll provide a functional-appearing interface but will use non-functional features internally. For example, the implementation of a function will still use assignments to local variables, but won’t modify global variables or have other side effects.
I am, however, curious if people have made attempts at more formal implementations of typing effectful computations. If anyone knows more (I didn’t find anything), please shoot me a message!
For the record, I’ll also refrain from complex abstractions - such as a generic / abstract class (or typeclasses) for the cache. I’m just going to assume that your production code should look closer to this:
def cache[F[_] : Cache, K, V]: Resource[F, K, V]Than that:
def RedisCache(): Resource[RedisClient[String,String]]def InMemoryCache(): Resource[RefMap[String,String]]But what we’ll do here is closer to the latter, since there’s a lot to get done.
An for the record, in scala, we would do all those things and would start by modeling the logic by means of small algebras as an abstract concept before all that:
Now it is time to get to work, as we apply these techniques to our business domain. A common way to get a feature design started is to decompose business requirements into small, self-contained algebras.
Volpe, Gabriel: Practical FP in Scala
For instance -
trait Cache[F[_], K, V] { def get(k: K): F[V] def set(k: K, v: V): F[Unit] // ...}Do as I say, not as I do, you know the drill.
A nice UML diagram↑
In a very procedural fashion, this simple process lends itself to create an UML diagram first, since we know the rough steps:
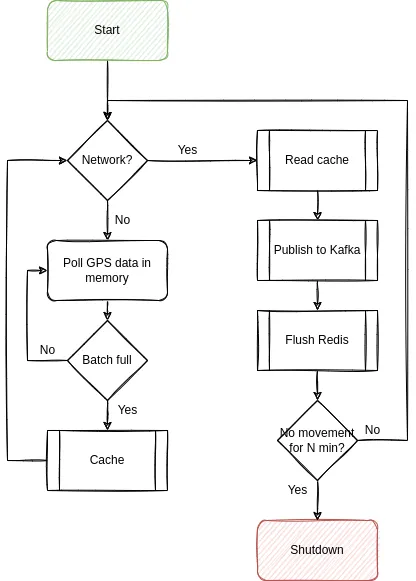
A handful of things to call out here:
- We should batch everything that we can. Remember our guarantees - they’re very lax, but they are guarantees!
- We should shut ourselves down if there was no movement for N minutes - so assume the car is parked at home (which we can determine by checking the WiFi connection)
Let’s sketch the signatures:
We need to capture GPS data↑
Straightforward: Talk to the GPS receiver, get data back. Has effects, since we might not be able to talk to it. Make sure it has the trip_id, so we know what trip we’re talking about.
def poll_gps(gps_client: Resource[GpsRecord], trip_id: int) -> IO[GpsData]Note: If you’re familiar with gpsd, you’ll realize that this has a flaw: The gps_client really is a gps_session and behaves as a mutable wrapper around the most recent nmea buffer and should not be passed around. The final version looks quite different, but we’ll talk about this further down.
We need to store data into redis↑
Really just a wrapper (or a weak abstraction) around the redis library calls. The input shouldn’t be empty.
def write_cache(client: Resource[Redis], records: NonEmptyList[GpsRecord]) -> IO[Unit]We need to read from redis↑
Same for reading the cache. Here, we can make this a generator as well, since we’ll most likely immediately push this to Kafka.
def read_cache(client: Resource[Redis]) -> Generator[GpsRecord]We need to push to Kafka↑
Which is another library wrapper.
def publish_data(client: Resource[Kafka], record: GpsRecord) -> IO[Unit]We need to determine when to read & publish↑
Since we can only publish once we have network connection, this can be a simple boolean test.
def is_network_available(expected_network: str) -> IO[bool]We need to determine whether movement has happened↑
This can be 2 neat functions:
def calculate_distance_in_m(x, y: GpsData) -> floatdef movement_has_changed_during_observation(records: List[GpsRecord], threshold_m: float) -> bool:There’s many ways of doing this, but since we’ve already established we’ll buffer data before writing to redis, we can simply:
- Calculate a simple distance (Pythagorean) between two points (or use a more complex function that “accurately” reflects distance on
anot-quite-a sphere, such as a Haversine or Vincenty distance) - Do this for each record in the buffer; if the mean of these points exceeds the threshold (a movement of >0m, calibrated to the precision of the GPS device), return
true, otherwise, assume we’re moving
This simple approach of course requires us to keep a buffer that has enough points to make an informed decision. If we don’t want to do that, we can simply keep a rolling average in a ring buffer (or, in Python, a double-ended queue, which can be bondend and has wonderful performance KPIs). Either way, the method signature does not care and simply expects a correct list that models the observation window.
Implementation: Python, yay!↑
I’m not going to call out everything here, but some interesting highlights:
Scaffolding allows you to write your main logic without thinking about it↑
What I mean by that: Once we have all these method signatures drafted (and ideally, annotated with comments), we can write the main function without having any functionality implemented yet. Note how this is a very naive implementation, without any buffering, retries, or the like - you’ll find that the actual on on GitHub is quite a bit different, but keeps the same general structure. Also the concept of main methods suck, but I won’t get into it - keep it simple, rememeber?
def main( gps_client: GpsClient, redis_client: RedisClient, kafka_producer: KafkaProducer, # Those should probably in a config file kafka_topic: str, expected_network: str, buffer_size=10, max_no_movement_s=300,) -> None: ring_buffer: deque[GpsRecord] = deque(maxlen=max_no_movement_s) _buffer: NonEmptyGpsRecordList = NonEmptyGpsRecordList(item=[]) for record in poll_gps(gps_client): # With or without network, we just collect data if len(_buffer) - 1 >= buffer_size: # Flush write_cache(redis_client, _buffer) _buffer = NonEmptyGpsRecordList(item=[]) # Only store valid records if record: _buffer.append(record) ring_buffer.extend([record]) # Flush data when you can if is_network_available(expected_network): for r in read_cache(redis_client): publish_data(kafka_producer, kafka_topic, r) clear_cache() # If we're at a standstill, shut down after N minutes if movement_has_changed_during_observation( list(ring_buffer), threshold_m=0.1 ): break # Collect one record per second time.sleep(1)Keep in mind, none of these functions have a body yet.
We could also immediately unit test against this, even though that makes mocking the library classes exceedingly difficult. I unit tested as I went about implementing functionality and wound up with ~90% line coverage at the end of this.
Also, remember the time.sleep(1) - it’ll show up again in a very fundamental bug at the end of this.
Types↑
In scala, we’d define custom types for things, so we can a) reason about functions based on their type signature and b) have the compiler yell at us if we break the contract.
Unfortunately, to the best of my knowledge, even something simple like this isn’t possible (see here) with mypy (which is already a superset of the language) in Python:
T = TypeVar('T')NonEmptyList[T] = NewType('NonEmptyList', List[T])However, this is:
T = TypeVar('T')NonEmptyGpsRecordList = NewType('NonEmptyGpsRecordList', List[GpsRecord])So we’ll take what we can get, I guess.
Finding what WiFi network is available↑
This is something where we have to rely on the OS to tell us, which doesn’t make this very portable.
def is_network_available(expected_network: str) -> bool: try: return subprocess.check_output(['iwgetid', '-r']).decode('ascii').replace('\n','') == expected_network except Exception: return FalseFor instance, once we’re offline:
❯ iwgetid -r❯ echo $?255I’d be glad to find out if there’s a better way, short of doing something that starts with if uname == 'darwin'....
But sometimes, using subprocess isn’t the worst thing in the world. Portable software is a lie, anyways.
Config Parsing via Domain Models↑
Another case for good models: Configuration files. This:
@dataclassclass GeneralConfig:    expected_wifi_network: str    shutdown_timer_s: int = 10    cache_buffer: int = 10
# ...
@dataclassclass Config:    general: GeneralConfig    cache: CacheConfig    kafka: KafkaConfig
Is a very clear model with a clear accessor pattern, default and mandatory values, and a clear hierarchy we can read into from any dict via dacite.
No more try: int(config.get('someSuperSpecificKey', '0')) … to parse a config. And barely more coding work to set up, even for a fun weekend/after work project!
Unit Testing gpsd & more type trouble: Python class vs. dict war stories↑
Another fun example of “typing is cool”, the return type of gps_client.next() is… well, not specified. However, we know that the actual GPSD protocol is built on top of json:
The GPSD protocol is built on top of JSON, JavaScript Object Notation, as specified in [RFC-7159]: The JavaScript Object Notation (JSON) Data Interchange Format. Similar to ECMA 404.
…
Responses are single JSON objects that have a “class” attribute the value of which is the object type . Object types include, but are not limited to: “TPV”, “SKY”, “DEVICE”, and “ERROR”. Objects are sent both in response to commands, and periodically as gpsd sends reports. Each object is terminated by a carriage return and a new line (CR-NL).
Which is why we need to check for the class attribute of the returned “thing”/object and filter out the TPV object (Time Position Velocity), since that is what we need. However…
Here’s how a “raw” TPV object looks like:
{"class":"TPV","device":"/dev/pts/1", "time":"2005-06-08T10:34:48.283Z","ept":0.005, "lat":46.498293369,"lon":7.567411672,"alt":1343.127, "eph":36.000,"epv":32.321, "track":10.3788,"speed":0.091,"climb":-0.085,"mode":3}In standard python, you can turn this into an dict by pasting it just like that into your REPL. However, the old code I used 3 years ago used getattr and a subscribtable accessor (__get_item__(self, item)):
if report["class"] == "TPV": long = getattr(report, "lon", 0.0)Why, you ask? Well, the official docs access object attributes directly:
if ((gps.isfinite(session.fix.latitude) and gps.isfinite(session.fix.longitude))): print(" Lat %.6f Lon %.6f" % (session.fix.latitude, session.fix.longitude)) else: print(" Lat n/a Lon n/a")While other parts of the official docs pretend it’s a dict:
if session.data['class'] == 'DEVICE': # Clean up our current connection. session.close() # Tell gpsd we're ready to receive messages. session = gps(mode=WATCH_ENABLE) # Do more stuffNow, getattr is used for getting named attributes in objects. The neat thing is: It can provide defaults, since many values in the GPSD spec are optional. Based on the official docs, getattr is the logical conclusion here (and that’s why you’ll find it in blog posts, of course as usual, without any rhyme or reason, presumably copy-pasted from elsewhere).
It does, however, not work on dicts:
>>> tpv={"class":"TPV","device":"/dev/pts/1",... "time":"2005-06-08T10:34:48.283Z","ept":0.005,... "lat":46.498293369,"lon":7.567411672,"alt":1343.127,... "eph":36.000,"epv":32.321,... "track":10.3788,"speed":0.091,"climb":-0.085,"mode":3}>>>>>> tpv['class']'TPV'>>> getattr(tpv, "lon", 0.0)0.0>>> # 0.00 is clearly wrong!At the same time, the same fun combo of accessor methods doesn’t work on regular old classes:
>>> from dataclasses import dataclass>>> @dataclass... class Example:... lon: float...>>> e = Example(10.0)>>> getattr(e, 'lon', 0.0) # works10.0>>> getattr(e, 'class', None)>>> e['class']Traceback (most recent call last): File "<stdin>", line 1, in <module>TypeError: 'Example' object is not subscriptableSo, how does the library do it? Well, they (just like any other, older Python package) defines their own dict wrapper:
lass dictwrapper(object):    "Wrapper that yields both class and dictionary behavior,"
    def __init__(self, ddict):        "Init class dictwrapper"        self.__dict__ = ddict
# ...
    def __getitem__(self, key):        "Emulate dictionary, for new-style interface."        return self.__dict__[key]# ...# See https://gitlab.com/gpsd/gpsd/-/blob/release-3.19/gps/client.py#L296
Which now of course works with both getattr and a direct accessor.
Which means… this works just fine:
if report['class'] == 'TPV': # Get data lat = report.get('lat', 0.0) lon = report.get('lon', 0.0) altitude = report.get('alt', 0.0) speed = report.get('speed', 0.0) return GpsRecord(lat, lon, altitude, speed, datetime.now())While this is easy to test once you have unit tests, I actually connected the physical GPS dongle to my laptop and hooked up a debugger before simply changing it to report.get(field, default), like any other dict. I just didn’t trust what I read after that rollercoaster ride.
You know what would have avoided this? A type signature!

Version Trouble↑
The gps package published to PyPi is only compatible with Python 3.8, because 3.9 removed the encoding keyword in JSONDecoder:
TypeError: JSONDecoder.__init__() got an unexpected keyword argument 'encoding'This can be fixed via
pyenv install 3.8.13poetry env use ~/.pyenv/versions/3.8.13/bin/python3poetry shellpoetry installThis is, however, not the fault of the maintainers of gpsd, see the issue here, since they do not maintain the pip project (or any binaries for that matter). If you can, build it from scratch.
ipv6 loopback needs to be enabled↑
Please see https://bugs.debian.org/cgi-bin/bugreport.cgi?bug=818332
sudo sysctl -w net.ipv6.conf.lo.disable_ipv6=0Why? I have no clue. gpsd binds to 127.0.0.1:2947 if I’m not mistaken, but who knows.
redis: The usual sweetheart↑
A note on redis: As usual, it’s been just… pleasant. And well documented. lrange:
Available since: 1.0.0
Time complexity: O(S+N) where S is the distance of start offset from HEAD for small lists, from nearest end (HEAD or TAIL) for large lists; and N is the number of elements in the specified range.
ACL categories:
@read,@list,@slow
My code:
def read_cache(client: RedisClient) -> Generator[GpsRecord, None, None]:    """Reads from the redis cache, returning all records that have been buffered.
    Has side effects!
    Args:        client (RedisClient): Redis client
Yields: Generator[GpsRecord]: One record at a time, non-empty, non-null """ for r in client.lrange(REDIS_KEY, 0, -1): v = jsonpickle.decode(r) logger.debug("Decoded %s", r) yield v¯\(ツ)/¯
First Tests↑
First tests were done at my desk:
2022-08-01 00:00:00,311 - DEBUG main.py:main():200 - Found network Mynetwork2022-08-01 00:00:00,312 - DEBUG main.py:publish_data():144 - Publishing record: {"py/object": "__main__.GpsRecord", "lat": 0.0, "lon": 0.0, "altitude": -17.0, "timestamp": null, "speed": 0.0, "id": "0x5f534ad170dd"}2022-08-01 00:00:00,325 - DEBUG main.py:publish_data():144 - Publishing record: {"py/object": "__main__.GpsRecord", "lat": 0.0, "lon": 0.0, "altitude": -17.0, "timestamp": null, "speed": 0.0, "id": "0x5f534ad170dd"}2022-08-01 00:00:00,325 - DEBUG main.py:main():211 - No data yet, cannot determine standstill (buffer: 16)2022-08-01 00:00:00,326 - DEBUG main.py:main():218 - Polling GPS (buffer: 5)2022-08-01 00:00:00,326 - DEBUG main.py:poll_gps():96 - Point: {"py/object": "__main__.GpsRecord", "lat": 0.0, "lon": 0.0, "altitude": -17.0, "timestamp": {"py/function": "None.datetime.timestamp"}, "speed": 0.0, "id": "0x5f534ad170dd"}The data quality was as expected (note the null timestamp, the lack of filters for 0/0 lat/long tuples), but work it does.
redis had data, even though as inefficient string/json:
127.0.0.1:6379> keys *1) "buffer"127.0.0.1:6379> lrange buffer 0 51) "{\"py/object\": \"__main__.GpsRecord\", \"lat\": 0.0, \"lon\": 0.0, \"altitude\": -17.0, \"timestamp\": {\"py/function\": \"None.datetime.timestamp\"}, \"speed\": 0.0, \"id\": \"0x5f534ad170dd\"}"And we’re getting data via Kafka:
docker exec --interactive --tty broker \kafka-console-consumer --bootstrap-server broker:9092 \ --topic test \ --from-beginning{"py/object": "__main__.GpsRecord", "lat": 0.0, "lon": 0.0, "altitude": -17.0, "timestamp": null, "speed": 0.0, "id": "0x5f534ad170dd"}{"py/object": "__main__.GpsRecord", "lat": 0.0, "lon": 0.0, "altitude": -17.0, "timestamp": null, "speed": 0.0, "id": "0x5f534ad170dd"}{"py/object": "__main__.GpsRecord", "lat": 0.0, "lon": 0.0, "altitude": -17.0, "timestamp": null, "speed": 0.0, "id": "0x5f534ad170dd"}And if we don’t move (at a stationary desk…), it terminates:
2022-08-01 00:00:00,160 - DEBUG main.py:main():205 - Found network Mynetwork2022-08-01 00:00:00,162 - INFO main.py:movement_has_changed_during_observation():186 - Mean distance in m: 0.02022-08-01 00:00:00,163 - WARNING main.py:main():212 - Suspect standstill, shutting downWorks, ship it.
Unit and Integration Tests↑
As mentioned before, the repository has unit tests that makes heavy use of mock. This was slightly challenging due to all the IO.
@mock.patch("subprocess.check_output")def test_send_available_data_if_possible( self, mock_subproc, mock_empty_redis, mock_kafka): with mock.patch("tiny_telematics.main.KafkaProduction.create") as m_kafka: mock_subproc.return_value = b"WiFi" m_kafka.return_value = mock_kafka r = send_available_data_if_possible( "WiFi", redis_client=mock_empty_redis, kafka_topic="test", bootstrap_servers="server", ) # No data returned assert r == 0 # also, mock_empty_redis throws on delete() # i.e., this tests makes sure we don't delete dataWith regards to integration tests and synthetic data, please see gpsfake.
Containerize it↑
Speaking of, since all these steps we did manually here are very tedious, a simple Dockerfile helps greatly:
FROM python:3.8-slim-bullseye
VOLUME /config
COPY sbin/ .COPY sbin/init.sh .COPY tiny_telematics/ ./tiny_telematics/COPY pyproject.toml .
# DepsRUN ./setup_gps.sh# For crypography/poetry, we need the Rust compiler for ARMRUN apt-get updateRUN apt-get install cargo -yRUN pip install --upgrade pipRUN pip install poetry==1.1.14# BuildRUN poetry buildRUN pip install --force-reinstall dist/tiny_telematics-0.1.0-py3-none-any.whl
# StartENTRYPOINT ["/bin/bash", "init.sh"]
The ENTRYPOINT here is just a simple script that makes sure gpsd is running:
#!/bin/bash/bin/bash setup_gps.shpython -m tiny_telematics.main "$@"Even though that entire setup_gps.sh script is a story of “works on my machine(s)”, but that’s a story for another time. For now, let’s just assume you need that.
This also allows us to deploy this onto the Raspberry Pi with ease.
For that, we’ll need to simply build a multi-arch image:
# Set a new builder❯ docker buildx lsNAME/NODE DRIVER/ENDPOINT STATUS PLATFORMSdefault * docker default default running linux/amd64, linux/arm64, linux/riscv64, linux/ppc64le, linux/s390x, linux/386, linux/arm/v7, linux/arm/v6❯ docker buildx create --name cross --config ./buildkitd.toml# Build & push❯ docker buildx use cross❯ docker buildx build --platform linux/amd64,linux/arm/v7,linux/arm64 -t bigiron.lan:5001/tiny-telematics:latest --push .We can now pull this image from the container registry (bigiron.lan:5001) on the Pi!
To run it, give it access to /dev and the host network (so it may detect the WiFi):
docker run -v $(pwd)/config:/config --device=/dev/ttyACM0 --net=host --restart=on-failure:5 tiny-telematics --config /config/default.yamlA note on armv6↑
The original Raspberry Pi Zero W runs armv6. I was not able to get this to work -
- A cross-platform build got stuck while trying to compile the
cryptographypackage dockeron theRaspberry Pi Zero Wdoes not work; while there used to be workarounds, namely downgrades, those stopped working as well
So, using docker works fine on more modern RasPis that use armv7 or arm64. The GitHub project outlines steps to run this on systemd instead.
Point still stands: Multi-arch images hosted in your basement are cool.
Conclusion↑
Given the absurd length of this article, this concludes part 1.
We’ve done a lot of heavy lifting here: Building a reproducible execution environment for a Raspberry Pi, designing the application, thinking through the model & the overall flow of data, actually building the application, and doing some basic testing due diligence. The client application can collect data via gpsd, cache it in redis, and can talk to Kafka, even though we haven’t set up the latter.
Once everything gets up together, we get neat maps as such:
Next time↑
Next time, we’ll cover…
- Setting up a lot of backend infrastructure:
Flink,Kafka,mariaDB, mostly viaDocker - Building a streaming pipeline in
Flink: Fun times inscala! Additional guests:newtype,circe, and others! - All is put together, let’s go on the road: Real-life testing
- Data visualization: Using
Apache Supersetto build cool maps - Conclusion & Lessons learned
All code is on GitHub as usual.
All development and benchmarking was done under GNU/Linux [PopOS! 22.04 on Kernel 5.18] with 12 Intel i7-9750H vCores @ 4.5Ghz and 32GB RAM on a 2019 System76 Gazelle Laptop, using scala 2.12.16