It’s me again, I’ve wasted more time with the various computers in our basement. I’ve wrote several of these before.
As usual, I don’t necessarily claim to be an expert on all of this; I just like to share things that I learned (or find worth writing about). For me, home labs are all about learning and experimenting. [1]
[1]: Also the whole “be reasonably independent from giant mega corporations holding your data hostage”, but who’s counting?
tl;dr: My network↑
Just for context:
- 2 node Proxmox cluster + TrueNAS non-clustered backup machine, 88 cores, 296 GB RAM, 60 TB
zfs(~120 TB raw) - Dell R740XD, Proxmox (primary node; 2x Xeon Gold 6248 CPUs 20C/40T ea @ 2.5Ghz, 256GB DDR4 RAM)
- Raspberry Pi 5, ARM64 Proxmox (fallback; 4 core A76 ARM64, 8GB RAM)
- Proxmox Backup Server (virtualized/container… yes yes I know)
- Commodity hardware NAS with TrueNAS (bare metal; Ryzen 3 2200G (4C/4T), 32GB DDR4 RAM)
- 2 UPS
- Networking is Mikrotik (RB4011 + switches) and UniFi for WiFi (self hosted controller)
- Mix of VMs and containers
- Everything
zfswhere feasible, usually as simple mirrors for hardware redundancy - Monitoring via Grafana powered by Prometheus and InfluxDB
- HTTPS with
traeffik+dnsmasq/PiHole/the usual networking magic - I run a custom
http4s/Scala 3HTTP server that aggregates Proxmox, Grafana, and other alerts and sends them to a Telegram bot MacOSclient (hence the/Volumesin examples)
More details here if you care.
Now that you have a rough idea, let’s get into all the stuff that broke that taught me something useful.

Raspberry Pi 5s can use NVME SSDs, actually↑
I logged into my Raspberry 5 (an ARM Proxmox node via pxvirt) and realized that everything was very, very - and I cannot stress this enough - very slow. A simple SSH login would take minutes.
NOTE
In case you don’t know, running Proxmox on ARM or running a RasPi for a server in general is all sorts of stupid. But they’re so powerful for so little power draw! And ARM is cool! Anyways… maybe don’t do this. Also maybe set SSH timeouts.
The main reason why I’m using the Pi is simply because I have it sitting around (and got it for free). I’m not suggesting buying one for a Proxmox cluster.
The Dying Breath of a Sacred SD Card↑
The obvious answer here is: The SD card that runs the Pi is dying, since that’s an inevitability (despite the VMs running on an external drive). I’d usually expect this to happen fully - i.e., it just stops working one day - and not behave like a broken RAM module with essentially undefined behavior, but I suppose it makes sense that random I/O timeouts aren’t bad enough to crash the system (especially if we haven’t lost crucial data), but bad enough to make it de-facto unusable. [2]
I also guess that with virtualization, everything lives either in memory or the external VM storage (rather than on the dying card), which is why the VMs themselves never caused any issues, didn’t run slowly, or triggered any alerts (SD cards, of course, do not support S.M.A.R.T, so there’s no direct alerts for this type of failure).

I confirmed all this via dd, which was very unhappy:
sudo dd if=/dev/rdisk4 of=$HOME/2025-10-01_Pi5-32.img bs=4mdd: /dev/rdisk4: Operation timed out1+0 records in1+0 records out4194304 bytes transferred in 26.706714 secs (157051 bytes/sec)You can force dd into submission via conv=noerror,sync, btw. That won’t get you your data back, though.
Interesting, but expected. I keep a stash of micro SD cards around for this reason and I don’t keep anything on the root drive that’s important (VMs are, like I said, on external storage + backed up via PBS). Pi Zeros just get re-flashed when I need to, since code and config live in git anyways.
[2]: …and if you find the title weird, you just don’t like good music.
Turns out, you don’t need an SD card at all↑
What I didn’t know, however, is that Raspberry Pi 5s can actually support NVME drives! Turns out a $12.90 GeekPi N04 M.2 NVMe to PCie Adapter will fully power a full sized (well, 2260) SDD (provided you have 5V/5A power).
Behold:

Pi 5 with an SSD.
(Credit: by me)
The install was super simple, although I had to glue a bunch of heatsinks (which I also keep in stock in bulk) onto the various chips, since the HAT would mean I loose my active cooling. It’s not… ideal:
vcgencmd measure_temptemp=67.0'CI mean, it’s within the thermal spec - it throttles at 85C - but still, more work could be done here (this is a bit of a theme here).
Installing an OS hasn’t been this hard since 2006↑
Installation was a matter of getting cute with the install process. [3]
You see, unlike Debian or other standard OS, Raspberry Pi OS (which I still call Raspbian in my head and likely use in this article multiple times) is designed to be flashed to the SD card directly and doesn’t actually have an installer that can be booted from USB. If you flash the image onto a USB drive, it’ll just boot from there (that is useful in its own right).
Similarly, a standard Debian ISO won’t have the necessary firmware bundled in to be installed on a Pi directly. Debian ARM exists, obviously (that’s what Raspbian was/is, functionally), but I think this is the only semi-supported path. What I’m trying to say is, you might make this work with standard Debian if you want to tinker. I think Gunnar Wolf would be the expert of choice here.
Anyways, I’m to smoothbrained for that, so I’m using the official OS.
Thanks to the idea from this article of saving firstrun.sh, the generated script from the PI imager and re-using it, we can make this work.
First, flash the image to a USB drive and save /Volumes/bootfs/firstrun.sh to your local computer.
Next, edit /Volumes/bootfs/firmware/config.txt and add some firmware options to enable PCI-E and ignore current warnings - I used a MacBook Pro charger + cable while setting this up and still got the warning that I need a 5V/5A PSU.
dtparams=pciex1# or for pcie-3dtparams=pciex1_gen=3# PSU warningusb_max_current_enable=1# see below as to whykernel=kernel8.imgDANGER
Apparently, this isn’t exactly something you should do outside of a (literal) test bench, since a MBP charger won’t actually supply the full 25W. I do use the official power supply in the rack.
Please see this comment for details.
Then boot and on the Pi, run:
sudo apt update -ysudo apt full-upgradesudo reboot
sudo rpi-updatesudo reboot
sudo rpi-eeprom-update
# I found you will need this if you want the lite version w/o a GUIsudo apt install libopengl0 -ysudo apt install rpi-imager -y
wget https://downloads.raspberrypi.com/raspios_lite_arm64/images/raspios_lite_arm64-2025-10-02/2025-10-01-raspios-trixie-arm64-lite.img.xz
# Confirm the diskchristian@raspberry-5g:~ $ lsblkNAME    MAJ:MIN RM   SIZE RO TYPE MOUNTPOINTSsda       8:0    1  58.6G  0 disk├─sda1    8:1    1   512M  0 part /boot/firmware└─sda2    8:2    1  58.1G  0 part /nvme0n1 259:0    0 476.9G  0 disk
# scp firstrun.sh to the pisudo rpi-imager --cli --first-run-script ./firstrun.sh 2025-10-01-raspios-trixie-arm64-lite.img.xz /dev/nvme0n
And unplug the USB and voila, Pi-on-disk.
[3]: Once again commenting on the title of the paragraph, nothing “operating system installation” related happend actually in 2006, but Gothic 3 was released, so that’s worth mentionning, since it made you question whether your computer was functioning properly.
Proxmox and OOM kills↑
Now, getting Proxmox to work is a different story. Essentially, you want to follow these steps - but I’ve also run into some fun issues here that I didn’t run into last time I did this (I think).
First of all, without setting the kernel page size to 4K explicitly in /boot/firmware/config.txt
kernel=kernel8.imgEven simple VMs with 2GB Ram on an 8GB Pi would get weirdly OOM killed:
# journalctlOut of memory: Killed process 7527 (kvm) total-vm:3002544kB, anon-rss:628784kB, file-rss:27424kB, shmem-rss:3488kB, UID:0 pgtables:736kB oom_score_adj:0Despite ample free memory:
free -hm total used free shared buff/cache availableMem: 7.9Gi 2.4Gi 5.1Gi 80Mi 543Mi 5.5GiSwap: 2.0Gi 2.0Mi 2.0GiLastly, a… fun… observation I’ve made is that the ARM VMs need the OVMF (UEFI) BIOS (or not BIOS, I guess, but that’s what proxmox calls it).
While debugging the OOM issue above, disabling balooning memory and changing the BIOS seemed like logical first steps to fix this, since I clearly had enough memory.
The funny thing is, the VMs would boot with SeaBIOS, but not be accessible from anywhere - no ping from the host, no ping from elsewhere.
This, logically, would lead you to believe in an invalid network configuration, but keep in mind that these are just restored VMs and that the node itself was perfectly accessible: VMs just use a network bridge anyways, so if the host is OK and the VMs had previously been correctly configured for the router to recognize their MAC addresses, this couldn’t be the issue.
root@raspberry-5g-v2:~# ping 192.168.1.194PING 192.168.1.194 (192.168.1.194) 56(84) bytes of data.From 192.168.1.215 icmp_seq=1 Destination Host UnreachableEven worse, I also couldn’t us the Console in the UI (“Display output is not active”), neither the serial console:
qm terminal 125unable to find a serial interfaceWhich lead me down deeply unproductive rabbit hole about enabling the serial console to debug the network. And as I’ve said above, that was not the issue - the page size + BIOS was.
kpartx + chroot: A good combo↑
However, one useful thing I learned while wasting time there is that you can pretty easily chroot a VM, since you can mount the QEMU disk using kpartx:
cat /etc/pve/qemu-server/124.conf | grep /dev/zvolqm stop 124mkdir -p /mnt/vm124kpartx -av /dev/zvol/tank/vm-124-disk-1# root partitionmount /dev/mapper/vm-124-disk-1p2 /mnt/vm124And then just chroot as usual:
mount --bind /dev /mnt/vm124/devmount --bind /proc /mnt/vm124/procmount --bind /sys /mnt/vm124/syschroot /mnt/vm124 /bin/bash# ... do your stuff, umount and all thatumount /mnt/vm124kpartx -d /dev/zvol/tank/vm-109-disk-1qm start 124qm terminal 124So while the serial interface didn’t need fixing - it was all a red herring - I did learn about kpartx for QEMU VM disks, which I guess is a neat debugging tool.
You can deadlock Proxmox Backup Server↑
My telegram bot greeted me with about 30 of these one morning:

Turns out, if you let a PBS ZFS volume get full completely, you’re about to have a bad time.

PBS is somewhat like zfs (but not really)↑
You see, PBS stores data in a .chunk directory and exposes your VM backups/snapshots in the GUI and CLI. Similar to zfs snapshots, those files sit there and take up space until you run Garbage Collection - it’s a bit like a zfs snapshot that refers to old files, so deleting them won’t free space until you nuke the snapshot that keeps the references.
NOTE
Keep in mind that you can use zfs as PBS storage, but you don’t have to. They are unrelated concepts I happen to use in tandem, in case the similar phrases are confusing.
However, if the disk is full:
root@yggdrasil:/home/christian# zfs get quota,used,available ygg_backups/pbsNAME PROPERTY VALUE SOURCEygg_backups/pbs quota none defaultygg_backups/pbs used 2.63T -ygg_backups/pbs available 0BYou cannot run garbage collection, since that is an OS operation that needs at least a bit of space (as opposed to zfs destroy pool@snapshot, which talks to the file system directly). It will fail with ENOSPC: No space left on device.
In other words, you can lock yourself out of PBS. That’s… a design.
Unfortunately, you also just can’t (re)move .chunk files, since those might be in use by legitimate backups.
A simple fix↑
The fix took me a hot minute, but is actually really simple: Just remove all zfs snapshots. Not ideal, but since they will hold onto references to old .chunk files, they are what really holds the storage back.
zfs destroy ygg_backups/pbs@zfs-auto-snap_hourly-2025-01-16-1917And voila:

More long-term, set a quota on the pool:
zpool get -Hp size tank | awk '{printf "%.0fG\n",$2*0.95/1024/1024/1024}' | xargs -I{} zfs set quota={} ygg_backups/pbsSo this can’t happen. You could also reserve some spare gigs:
zfs set refreservation=8G ygg_backups/break-the-glassOther random garbage↑
Stuff that’s worth a paragraph, but doesn’t fit in elsewhere.
CyberPower UPS come with management software↑
Not a sponsor ™, but I own 2 CyberPower UPS and it turns out, their rack mounted offering ships with PowerPanel Business, which you just need to install.
It has neat event logs:
 Useful stats:
 And tons of advanced settings with beat out messing around with
 pwrstat or other CLI tools.
It’s also fully SNMP compatible, so if you’re like me and mess about with SNMP exporters and such, you can get this data into Grafana:

DAV Server↑
More of a mention that anything else, but I started running Davis as (CAL)DAV server for (shared) calendars and it’s been great. It’s super easy to run, works against my existing database servers, and has a sane API that I can use an ngrok Traffic Policy to expose only the needed endpoints on the internet:
version: 3endpoints: - name: davis url: https:// #.... upstream: url: "http://host.docker.internal:9001" traffic_policy: on_http_request: - name: block spam expressions: - "conn.client_ip.is_on_blocklist == true" actions: - type: custom-response config: content: Unauthorized request status_code: 403# ... - name: oauth expressions: - "!((req.url.path.contains('/dav/') || req.url.path.contains('/.well-known')))" actions: - type: oauth config: auth_id: oauth provider: google# ...I adore mealie, actually↑
Also more of a shoutout, but I’ve spend a lot of time recently sitting in my kitchen and typing printed recipes into mealie, the self hosted recipe manager of choice. I’ve even added a smol PR, using all of my impeccable frontend skills. I should mention that I am a very passionate cook (and not a passionate frontend person).
Part of this has been an archiving effort - say, preserving (and testing) old recipes from my own or other folk’s grandparents, like this recipe from the Cherokee County Historical Society’s Cookbook ca 1993 which I’ve tried, added notes, and adjusted:

But part of this has also been me developing and fine tuning my own recipes, this time a year specifically around hot sauces and other means of preserving the late harvest in our vegetable garden. It’s also great for cocktails, protein ice cream (yes, I’m one of the Ninja Creami people now), which often require lots of iteration to find a recipe that works for you.
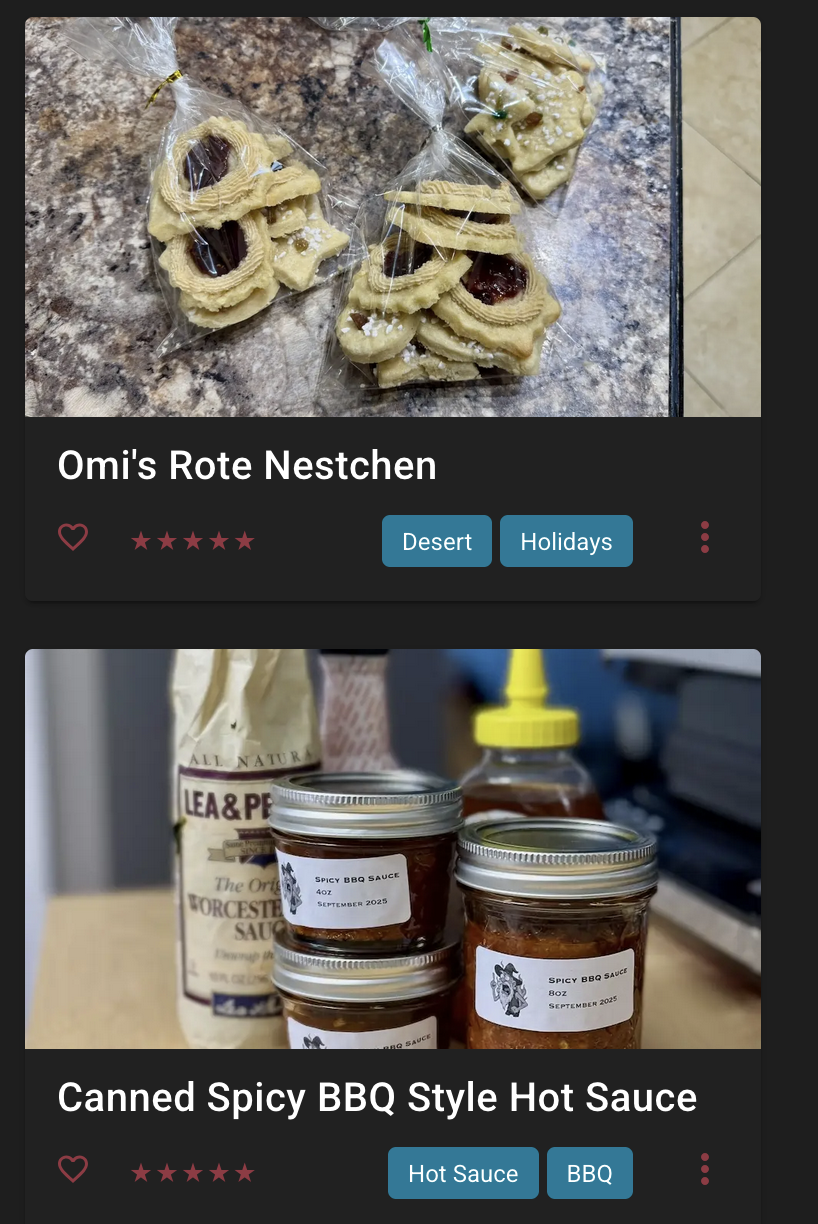
Top: My grandmothers cookies; Bottom: My own BBQ sauce.
(Credit: by me)
Doing this in mealie makes everything super accessible, since it uses a standard format, has a sensible tag and category system, and now even an ingredient parser. It’s been a truly fantastic tool and a time investment that (outside of “learn networking/sysadmin stuff”) has actually been worth it, since my first instinct when cooking something I don’t do often is to look at mealie to look at my recipes, not some random blog spam slop site that rehashes their life story for SEO, but has very little culinary benefit.
It also has, somewhat ironically, made me appreciate my physical cookbook collection more - if I don’t find a recipe in mealie, I will search through my cookbooks next (and perhaps digitize one if I like it, annotated with my own notes and pictures, of course). Only then will I consult the AI generated wasteland that is the internet.
Conclusion↑
Go build a server. I swear, it’s not a time sink at all. Promise.